AFFILIATE DISCLOSURE: We may earn a commission when you click on links to products on this page. As an Amazon Associate, we earn from qualifying purchases. This helps support our free guides at no extra cost to you.
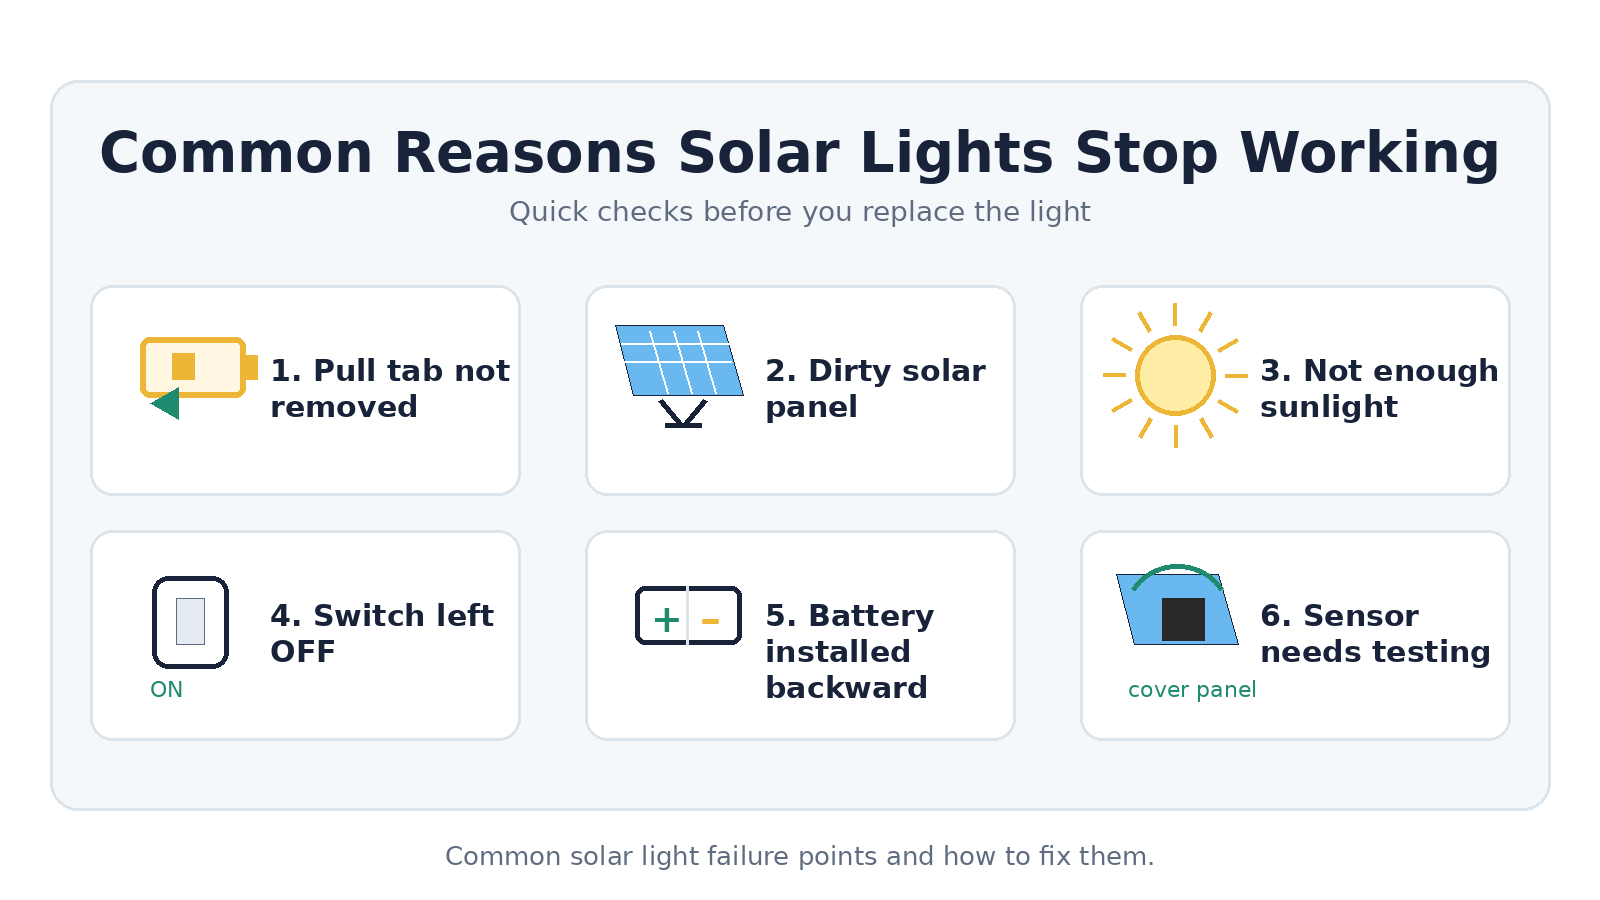
Why aren’t my solar lights working? The most common cause is a plastic pull tab between the battery contacts that was never removed. Other quick fixes: check the ON switch, clean the solar panel, and charge in direct sunlight for 48 hours before first use.
You installed solar lights or noticed older ones stopped working and… nothing. No glow at dusk. It’s frustrating, but in most cases the fix is simple. This guide walks you through the most common causes — from the obvious to the obscure — so you can get your lights working tonight.
Step-by-Step Troubleshooting Checklist
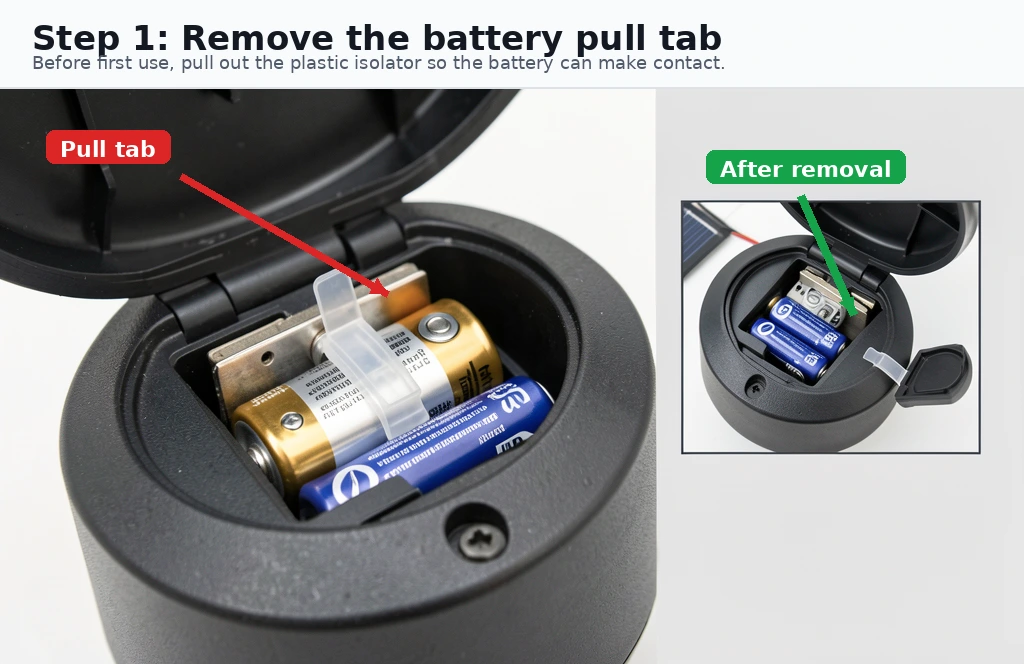
- Check the pull tab/battery isolator: Most new solar lights ship with a small plastic pull tab between the battery and the contacts. Open the battery compartment and make sure this tab has been removed. This is the #1 cause of “brand new solar lights not working.”
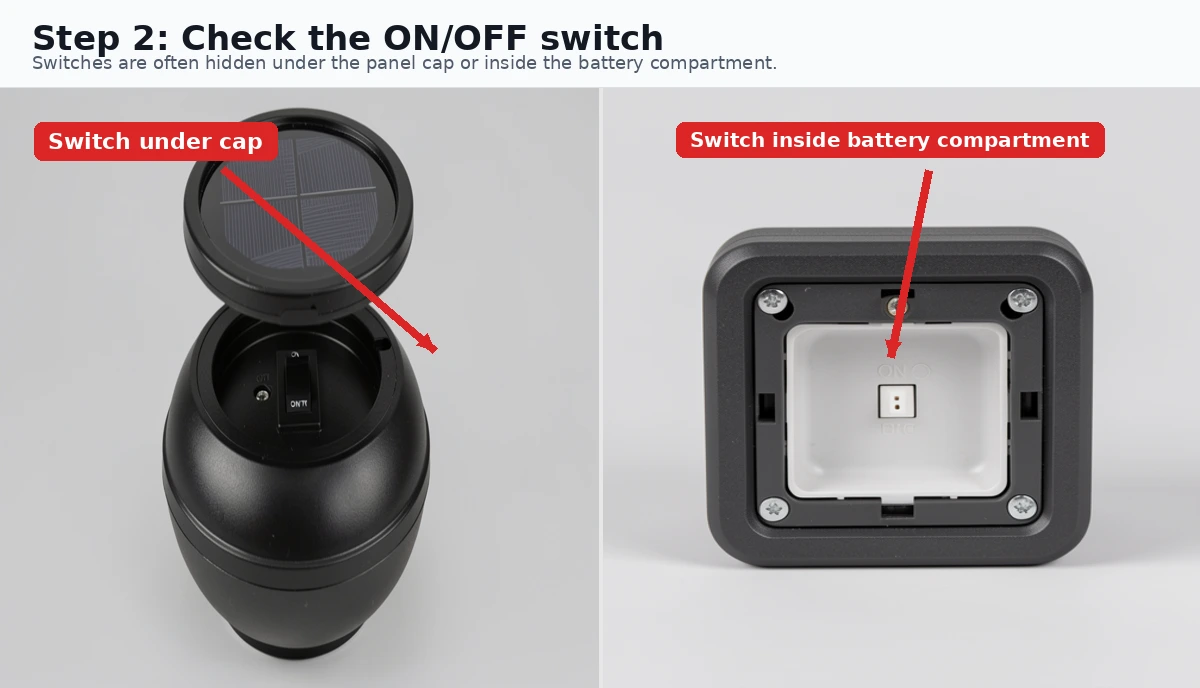
- Verify the ON/OFF switch: Many solar lights have a physical switch, often hidden under the solar panel cap or inside the battery compartment. Make sure it’s in the ON position. Some lights even have a “dim” and “bright” mode — cycle through them.
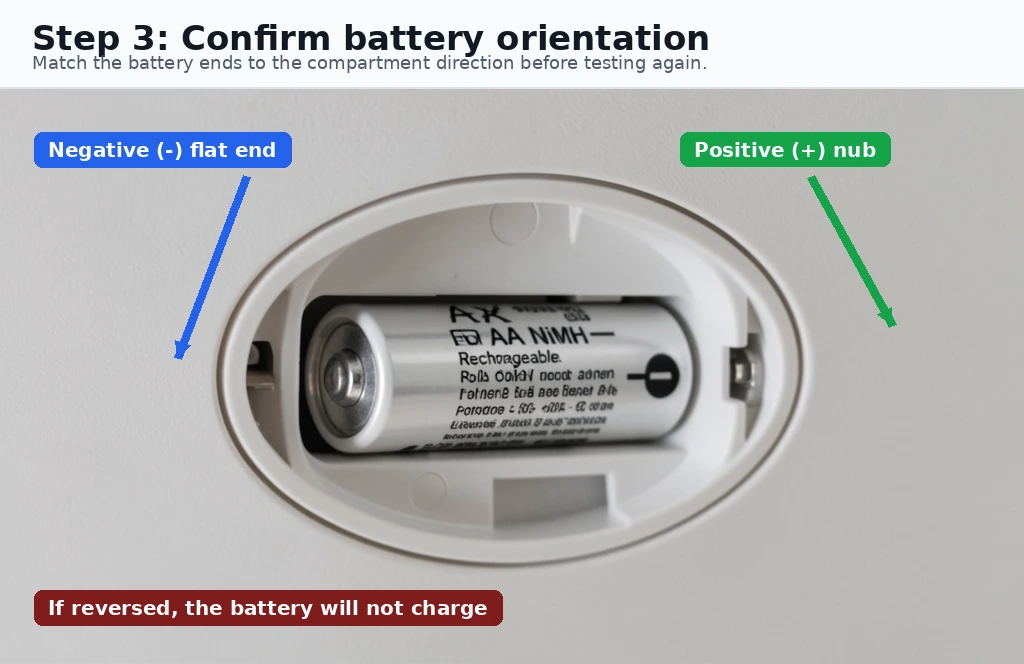
- Check battery orientation: If the battery was pre-installed or you’ve replaced it, verify the positive (+) and negative (?) terminals are oriented correctly. Reversed batteries will prevent charging.
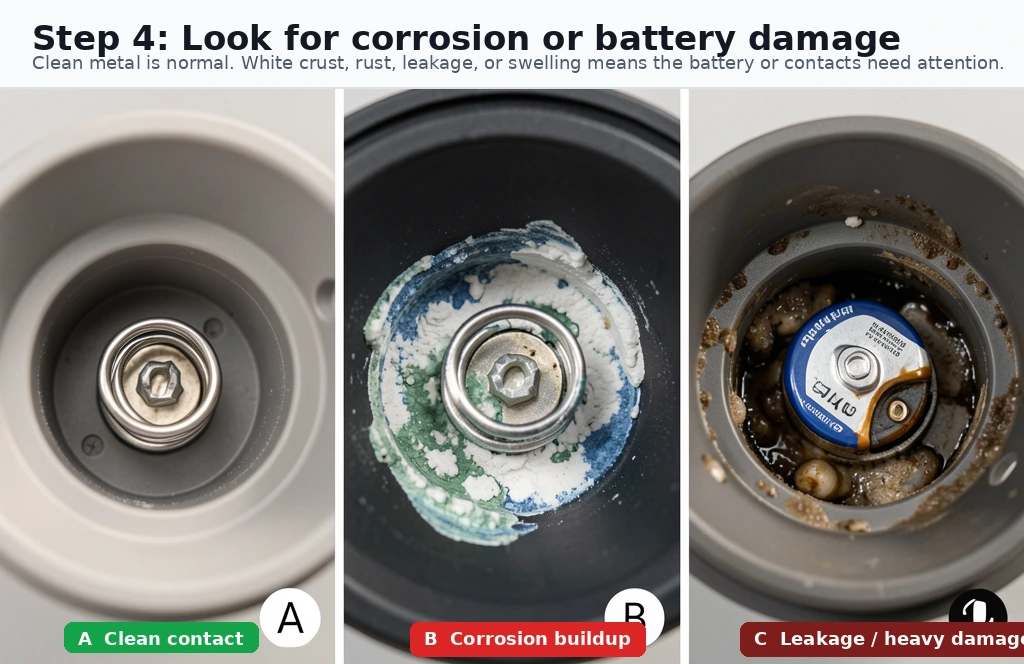
- Inspect the battery for corrosion or damage: Look for white or blue crust on the battery contacts. Clean gently with a cotton swab and white vinegar if needed. If the battery is swollen, cracked, or leaking, replace it immediately (standard NiMH AA or AAA rechargeable, typically 1.2V 600–1200 mAh).
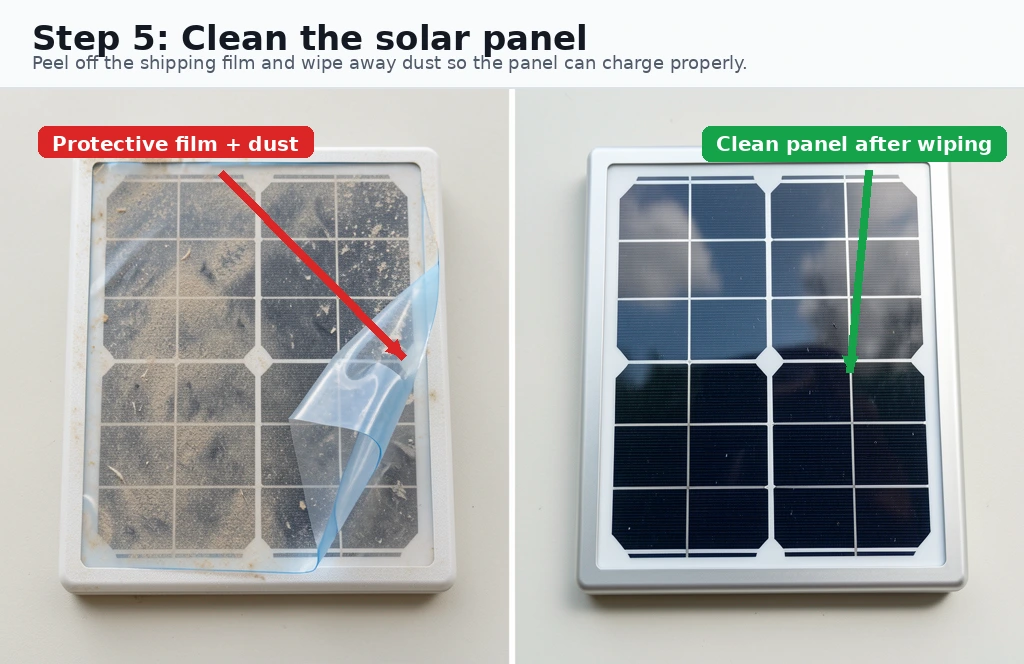
- Clean the solar panel: Even a thin layer of dust, pollen, or the protective film that ships on new lights can block enough sunlight to prevent charging. Wipe the panel with a damp cloth and remove any protective film.
- Ensure adequate sunlight: Solar lights need 6–8 hours of direct sunlight for a full charge. If you installed them in a shaded spot, under a tree canopy, or on a cloudy north-facing wall, they may never get enough sun. Relocate to a sunnier spot and test again.
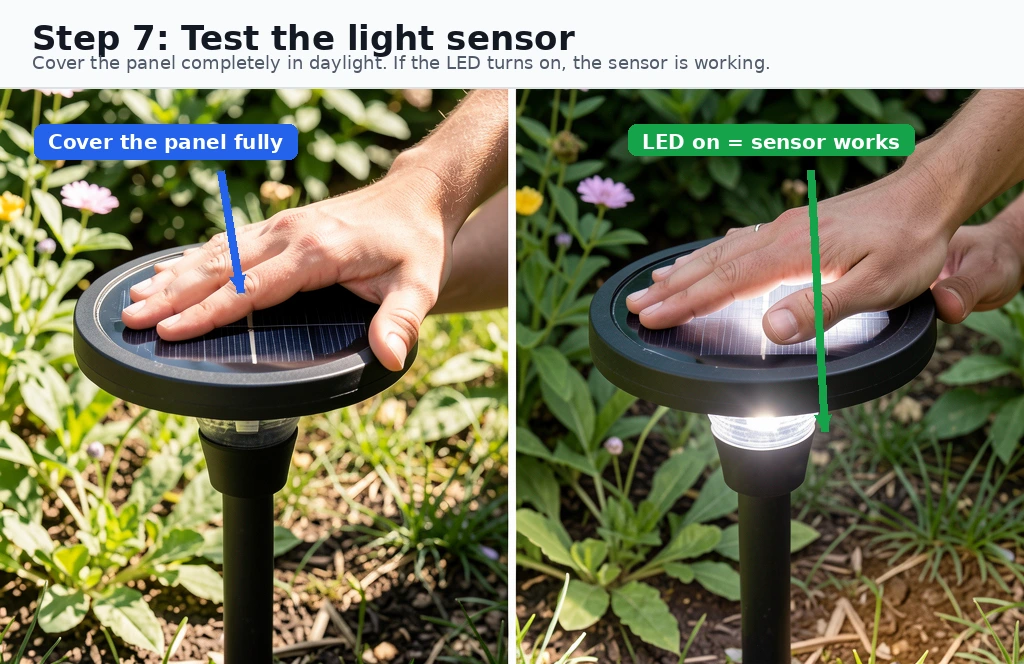
- Test the light sensor: Solar lights use a photoresistor to detect darkness. Cover the solar panel completely with your hand or opaque tape during the day. If the light turns on, the sensor is working. If not, the sensor may be faulty or the battery is completely dead.
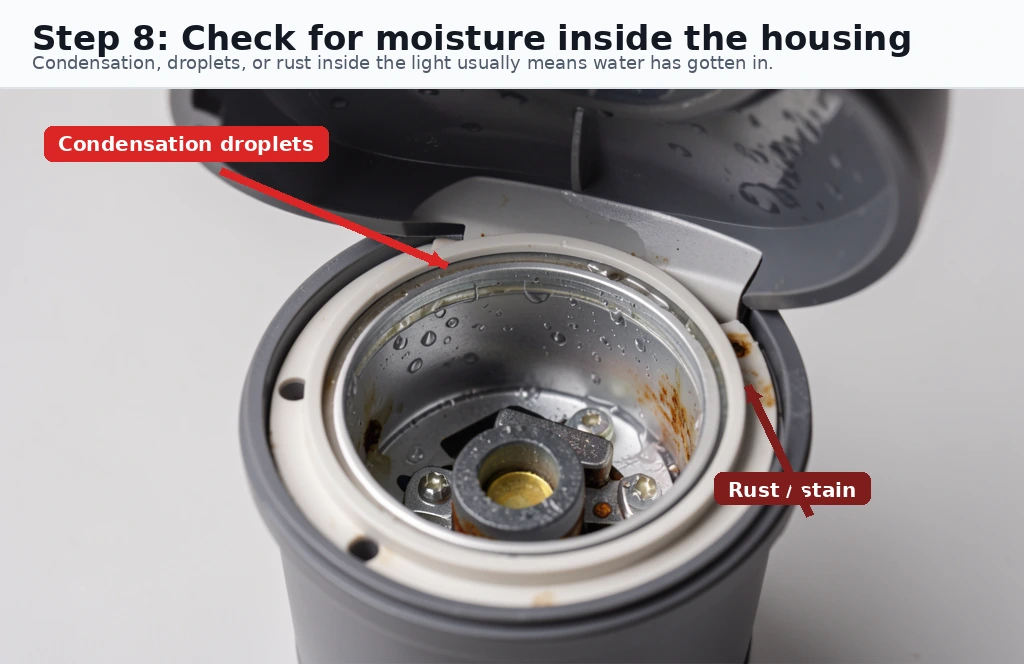
- Check for water damage: While most outdoor solar lights are weather-resistant, heavy rain or sprinkler exposure can seep into poorly sealed units. Open the housing and check for moisture, rust, or water droplets inside. Dry thoroughly before reassembling.
- Inspect wiring and connections: Look for loose, disconnected, or corroded wires between the solar panel, battery compartment, and LED. A broken solder joint is common on cheaper lights — if you’re handy with a soldering iron, this is often fixable.
- Try new rechargeable batteries: The included batteries in budget solar lights are often low-quality and may arrive dead or fail within weeks. Replace with a quality NiMH rechargeable (Energizer, Panasonic Eneloop, or EBL) — standard alkaline batteries will NOT work and may damage the light.
What size do you need? Open the battery compartment — the size is usually printed on the battery itself or the compartment door. Most solar path lights use AA; smaller puck-style lights use AAA. If you need replacements, compare compatible AA NiMH rechargeable batteries or AAA NiMH rechargeable batteries on Amazon.
Common Solar Light Problems and Quick Fixes
| Symptom | Most Likely Cause | Fix |
|---|---|---|
| Lights don’t turn on at all | Pull tab not removed, switch OFF, or dead battery | Check tab, toggle switch, replace battery |
| Lights turn on briefly then go out | Insufficient charge; dirty panel or shaded location | Clean panel, relocate to direct sun for 2 days |
| Lights are dim or flickering | Weak battery, cold weather, or corroded contacts | Replace battery, clean contacts, warm up battery indoors before placing outside |
| Lights stay on during the day | Faulty light sensor or sensor is blocked/covered | Clean sensor area, test by covering panel completely |
| Works sometimes, not others | Intermittent wiring, loose connection, or water ingress | Open and inspect wiring, dry out if wet, re-solder if needed |
| Lights worked for a week then stopped | Battery failed (common with included cheap cells) | Replace with quality NiMH rechargeable (Eneloop, EBL) |
When to Replace vs. Troubleshoot
Solar lights are generally inexpensive, and not all failures are worth fixing. Here’s a quick decision guide:
| Scenario | Recommendation |
|---|---|
| Pull tab or switch issue | Fix in 30 seconds — always troubleshoot first |
| Dead battery (light is otherwise intact) | Replace battery ($2–5) — much cheaper than a new light |
| Corroded contacts (minor) | Clean with vinegar and cotton swab — try before replacing |
| Water damage or rust (severe) | Replace the light — internal corrosion is rarely worth fixing |
| Broken LED or cracked housing | Replace the light — parts are rarely available individually |
| Multiple lights failed simultaneously | Check if they’re in a shaded area — the problem may be location, not the lights |
Choosing Better Replacement Solar Lights
If you decide your current lights aren’t worth saving, here’s what to look for when buying replacements:
- Battery type: Look for lights that use standard AA/AAA NiMH batteries (easily replaceable) rather than proprietary or integrated packs.
- Panel size: Larger solar panels charge faster and perform better in partial shade.
- IP rating: Look for IP65 or higher for reliable weather resistance.
- LED quality: Higher lumens per watt means brighter light from the same battery capacity.
- Brand reputation: Established brands tend to have better battery quality and weather sealing than generic/no-name lights.
Solar Lights FAQ
Why do new solar lights not work out of the box?
The most common reason is a small plastic pull tab between the battery contacts that prevents the circuit from completing. Remove the tab, turn the switch to ON, and place the light in direct sunlight for 48 hours to fully charge before expecting nighttime operation.
How long should I charge new solar lights before first use?
Allow new solar lights to charge in direct sunlight for at least 48 hours before first use. This initial full charge helps condition the battery and ensures maximum runtime on the first night. After that, 6–8 hours of direct sunlight daily is sufficient for regular operation.
Can solar lights work in winter?
Yes, but with reduced performance. Shorter daylight hours and lower sun angles mean less charging time. Snow covering the solar panel will prevent charging entirely. In northern climates (zones 3–5), expect 50–70% less runtime compared to summer. Keep panels clear of snow and position them facing south for best results.
What batteries do solar lights use?
Most solar lights use rechargeable NiMH (nickel-metal hydride) or NiCd (nickel-cadmium) batteries in AA or AAA sizes. Some newer models use LiFePO4 batteries. Replace batteries every 1–2 years for optimal performance. When replacing, match the battery type, voltage, and capacity (mAh) to the original specification.
Related Resources
- Solar Battery Guide — Learn about rechargeable battery types and how they work in solar applications
- 20 Solar Light Hacks That Harness the Power of the Sun — DIY ideas to get more from your solar lights
- Solar Backup Sizing Calculator — Calculate your energy needs for any solar project
- Buyer’s Guides Hub — More solar product comparisons and recommendations
Last updated: July 2026. This guide reflects common troubleshooting steps based on user-reported issues and solar light design principles. Specific models may vary — always consult your product manual first.