
A small shed, workshop, greenhouse, or hobby space is one of the best DIY solar use cases because the load is usually simple: lights, phone charging, a fan, and occasional small tools. The right way to approach it is not to start with panel size. Start with the load, then work backward to battery, controller, inverter, wiring, and protection.
This guide follows that sequence and stays practical: what a shed system can realistically power, how to size it, when MPPT is worth the cost, and where safety boundaries matter. For a deeper battery-bank safety walkthrough, cross-reference the DIY LiFePO4 solar battery bank guide. For controller selection, see Solar Charge Controller and Best Solar Charge Controller.
Can you power a shed with solar?
Yes — if the shed load is modest and you are realistic about what “off-grid power” means. LED lighting, a fan, a security camera, battery chargers, and light bench tools are all reasonable. Electric heat is usually not. A 1,500 W space heater running 8 hours a day consumes 12,000 Wh/day, which is an order of magnitude above a small shed system.
For context, the live AESV calculator currently uses 5 peak sun hours as a rough starting point for mixed U.S. climates and adds a 25% real-world solar margin. Under that planning model, a 400 W array supports roughly 1,600 Wh/day before site-specific adjustments. That is enough for lighting and small loads, but not for electric heating. Peak sun hours are equivalent full-sun hours, not the number of daylight hours.
Bottom line: a solar shed system is a good fit for light and intermittent loads. If your use case includes heat, compression tools, or frequent AC power, the system grows quickly and a mains feed or hybrid design may be more practical.
Size before you buy: Use the solar calculator to enter your shed load in Wh and get a planning estimate for battery capacity, panel watts, and controller class. If your use case is mostly lights and charging, the result should quickly show whether a 100 W, 200 W, or 400 W class system is the better starting point.
Start with a load audit
Write down every load you expect to run in the shed, how many watts it draws, and how many hours per day it runs. Multiply watts × hours to get watt-hours (Wh). Add the results, then add a little margin for inverter losses, cloudy days, cable losses, and future growth. Keep the margin honest: this is a sizing guide, not a fantasy spec sheet.
| Example shed load | Watts | Hours/day | Wh/day |
|---|---|---|---|
| 2 LED lights | 24 W total | 4 | 96 |
| Ceiling fan | 40 W | 6 | 240 |
| Battery/tool chargers | 120 W | 1 | 120 |
| Phone/laptop charging | 60 W | 3 | 180 |
| Total before margin | 636 | ||
| Total with 25% margin | 795 Wh/day |
That example lands at 795 Wh/day after a 25% margin. It is the right scale for a small shed system, and it is the level at which a compact LiFePO4 battery and a modest PV array can work well.
How much solar and battery do you need?
For the example load above, use the simple off-grid sizing sequence:
- Panel watts = daily Wh ÷ peak sun hours ÷ performance factor
- Battery Ah at 12 V = daily Wh ÷ 12 ÷ usable depth of discharge
- Charge-controller size = array current with margin, then choose PWM or MPPT based on array voltage and loss tolerance
Using the live AESV calculator with a known load of 795 Wh/day, 12 V, one backup day, and its current 5-hour mixed-climate starting point returns a 1,193 Wh battery target (about 99 Ah at 12 V), a 200 W solar array, and a 30 A controller class. These are educational planning outputs, so confirm the site’s seasonal solar resource and equipment limits before buying hardware.
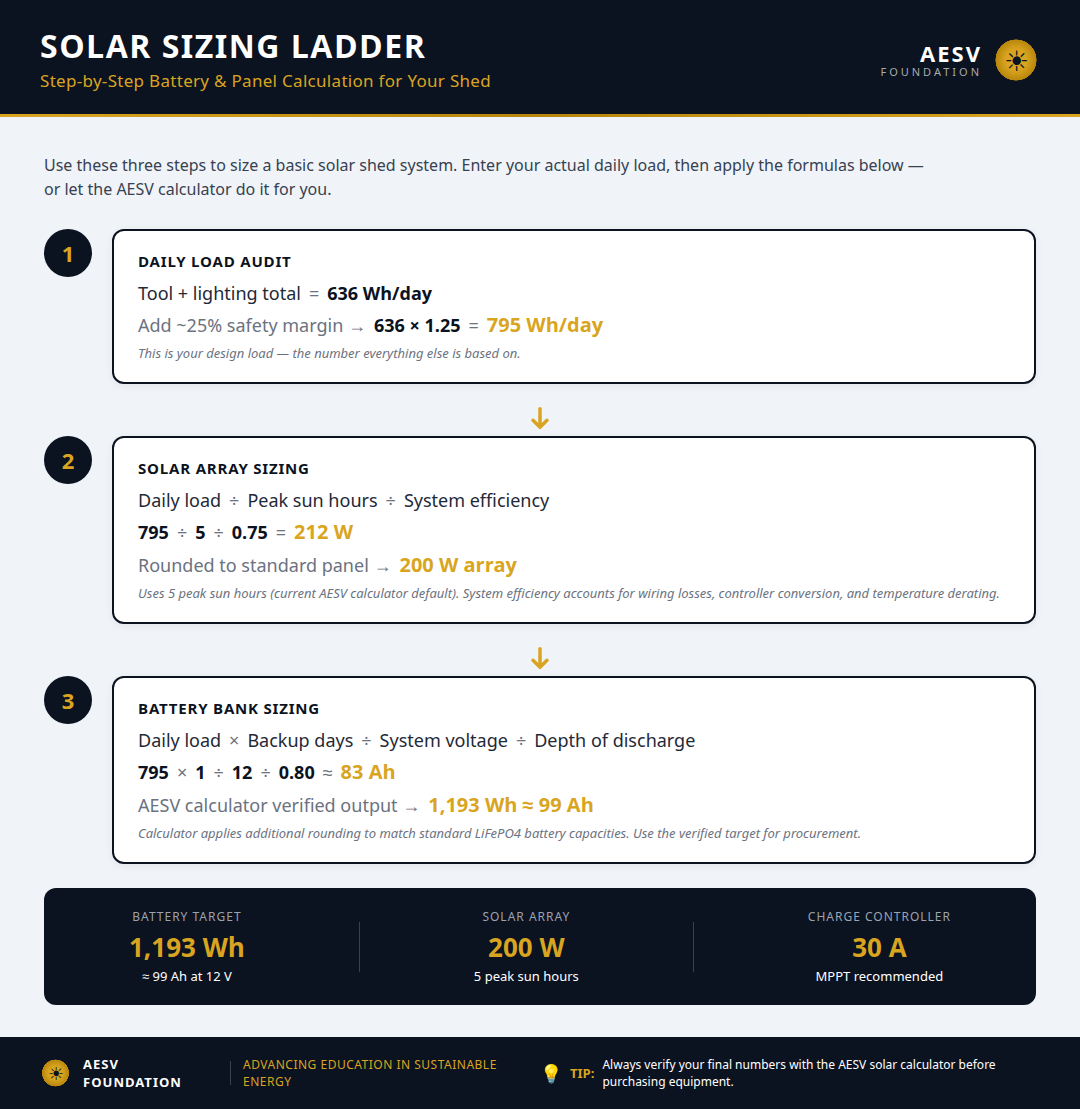
That is why many shed builds end up in the 100 W to 400 W panel range and the 50 Ah to 200 Ah battery range. The worked example points to a practical 200 W array and 100 Ah battery starting point. If you need AC output, add inverter losses and check startup surge rather than assuming the battery can absorb it for free.
Wiring, fusing, and voltage drop
Safety is where small solar projects are won or lost. Victron’s lithium battery guidance is clear: work with insulated tools, keep metallic objects off the battery, and mount the battery securely. Standard off-grid practice—reinforced by Victron’s broader wiring guidance—adds correctly rated overcurrent protection on every battery run. Keep cable runs short and use properly sized cable to limit voltage loss. For this planning example, approximately 2% voltage drop is the design target.
For a 12 V shed system, voltage drop matters more than in higher-voltage designs because every lost volt is a larger percentage of the total. The table below uses the standard DC voltage-drop formula with copper resistivity assumptions and a 2 m one-way run. It is an example, not a substitute for local code, manufacturer manuals, or final connector ratings.
| Copper cable | Current | One-way run | Approx. drop | Drop % of 12 V | Takeaway |
|---|---|---|---|---|---|
| 6 mm² | 30 A | 2 m | 0.35 V | 2.92% | Borderline for a short controller run |
| 10 mm² | 30 A | 2 m | 0.21 V | 1.75% | Better fit for a small MPPT-to-battery run |
| 16 mm² | 30 A | 2 m | 0.13 V | 1.08% | Good headroom if the run is longer or hotter |
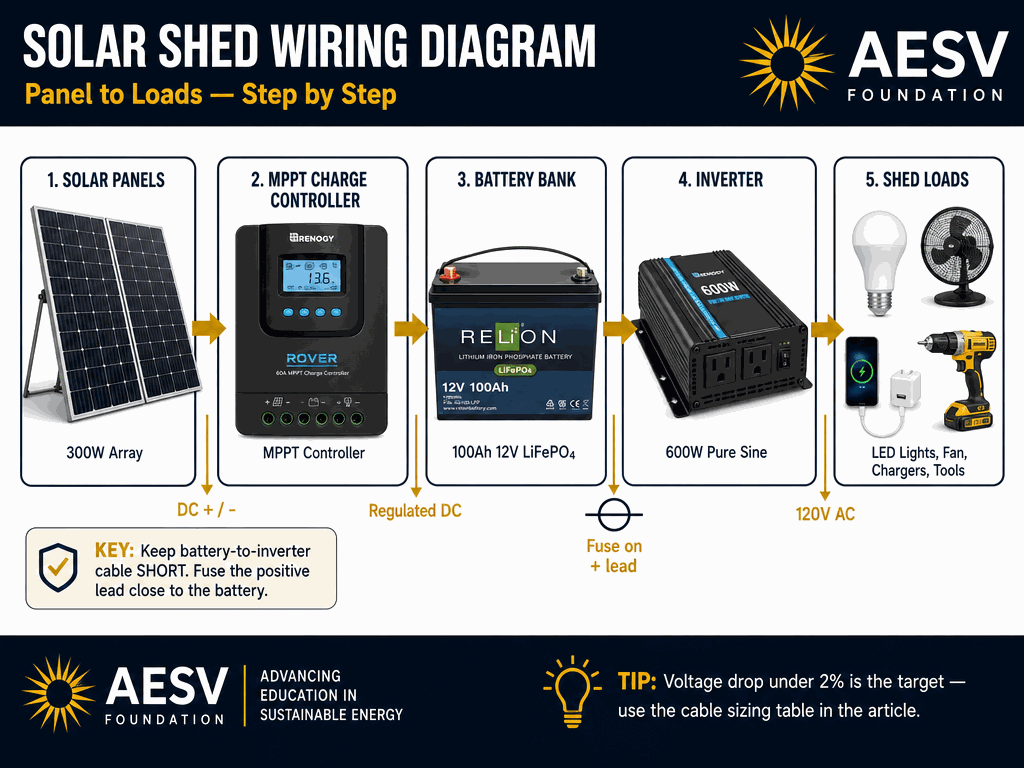
The practical rule: keep the battery-to-inverter cable as short and heavy as possible, fuse the positive conductor close to the battery, and use an MPPT controller when array voltage, winter performance, or wire loss make PWM the wrong tool. A shed system is small, but the same failure modes apply as in any larger off-grid build: overcurrent, loose lugs, undersized cable, and poor ventilation.
For deeper component guidance, use the Home Battery Backup Sizing Guide for battery sizing logic and the DIY LiFePO4 Solar Battery Bank Safety, Sizing & Wiring guide for BMS and fuse details. If the design starts leaning toward AC-heavy use, compare the stationary shed design with RV Solar Panel Kit Installation and the DIY Portable Solar Generator Power Station Build.
Tiered parts list for a solar shed
Use the tiers below as planning ranges, not as a universal shopping list. Check every component against your measured load, battery voltage, controller limits, inverter surge requirement, and local installation rules.
| Tier | Best for | Solar array | Battery | Controller | Inverter | Budget band |
|---|---|---|---|---|---|---|
| Light | Lights, charging, camera | 100 W | 50 Ah LiFePO4 | 10 A MPPT | Optional 300 W | Lowest |
| Moderate | Lights, fan, small tools | 200 W | 100 Ah LiFePO4 | 30 A MPPT | 300-600 W pure sine | Mid-range |
| Heavy | Longer runtime, AC use, larger buffer | 400 W | 200 Ah LiFePO4 | 30-40 A MPPT | 1,000-2,000 W pure sine | Highest |

The tier should match the actual shed load. A 100 W system can be excellent for lighting and charging. A 400 W system can handle a broader use case, but it is still not a substitute for electric heat. If you would rather buy an integrated unit than hardwire separate components, compare the options in Solar Powered Generators before deciding to build.
Build sequence
- Define the shed loads and total daily Wh.
- Choose the battery voltage, usually 12 V for small sheds.
- Size the battery for autonomy and chemistry limits.
- Choose panel watts from daily Wh, sun hours, and derate.
- Pick an MPPT controller with enough current headroom.
- Size cable for current and voltage drop, not just for “will it work.”
- Fuse the battery positive close to the battery.
- Mount hardware securely and leave room for heat, service access, and future expansion.
- Test charging, low-voltage cutoff, and inverter startup under real load.
Victron’s installation guidance is especially useful here: mount batteries securely, keep clearances for ventilation, use properly sized cable, and never treat the battery terminals casually. Those are not “nice to have” details; they are the difference between a tidy hobby build and a reliable off-grid system.
Frequently Asked Questions
How many panels do I need for a solar shed?
For a small shed with lights and charging, 100 W to 200 W is often enough. If you want a fan, more runtime, or some AC use, 300 W to 400 W may be a more realistic starting point. Always size from Wh/day, not panel count alone.
Can solar run tools in a shed?
Light tools and battery chargers are usually fine. High-surge tools, saws, and anything with a large startup load require a larger inverter and battery bank than most readers expect. If the load is intermittent and heavy, the system can get expensive quickly.
Can I heat a shed with solar?
Usually not in a practical small DIY format. Resistive heat is a very large daily Wh load, and it forces the array, battery, and inverter to grow fast. If heat is the main requirement, a different energy strategy is usually better.
Do I need MPPT or is PWM enough?
PWM can work on very small systems where array voltage and battery voltage are closely matched. MPPT is usually the better shed choice because it handles a wider voltage mismatch and typically harvests more energy under real-world conditions.
Should I use 12 V or 24 V?
Most small sheds stay at 12 V because the loads are modest and the system is simple. If the design grows, 24 V can reduce current and cable loss. The worked example uses 12 V as a practical entry point.
