
Affiliate disclosure: AESV is reader-supported. If you buy through links on this page, we may earn a commission at no extra cost to you. We only recommend products and services we’ve researched thoroughly for quality, reliability, and value.
Safety note: Disconnect any existing battery before you start, work in dry weather, and use insulated tools and eye protection throughout the install.[1][5]
Installing an RV solar panel kit is mostly a wiring, protection, and layout exercise: the panels have to feed the controller correctly, the controller has to protect the battery bank, and every cable run has to be sized for the current and distance it will actually carry.[1][2][3]
There is no universal solar setup for every rig, and the U.S. Department of Energy advises homeowners to think through whether solar is right for their roof and budget before they buy hardware.[5] For RV work, that same logic means you plan the route, the cable length, the battery location, and the controller placement before you make a single hole.[1][5]
What an RV solar kit actually includes.[1][5]
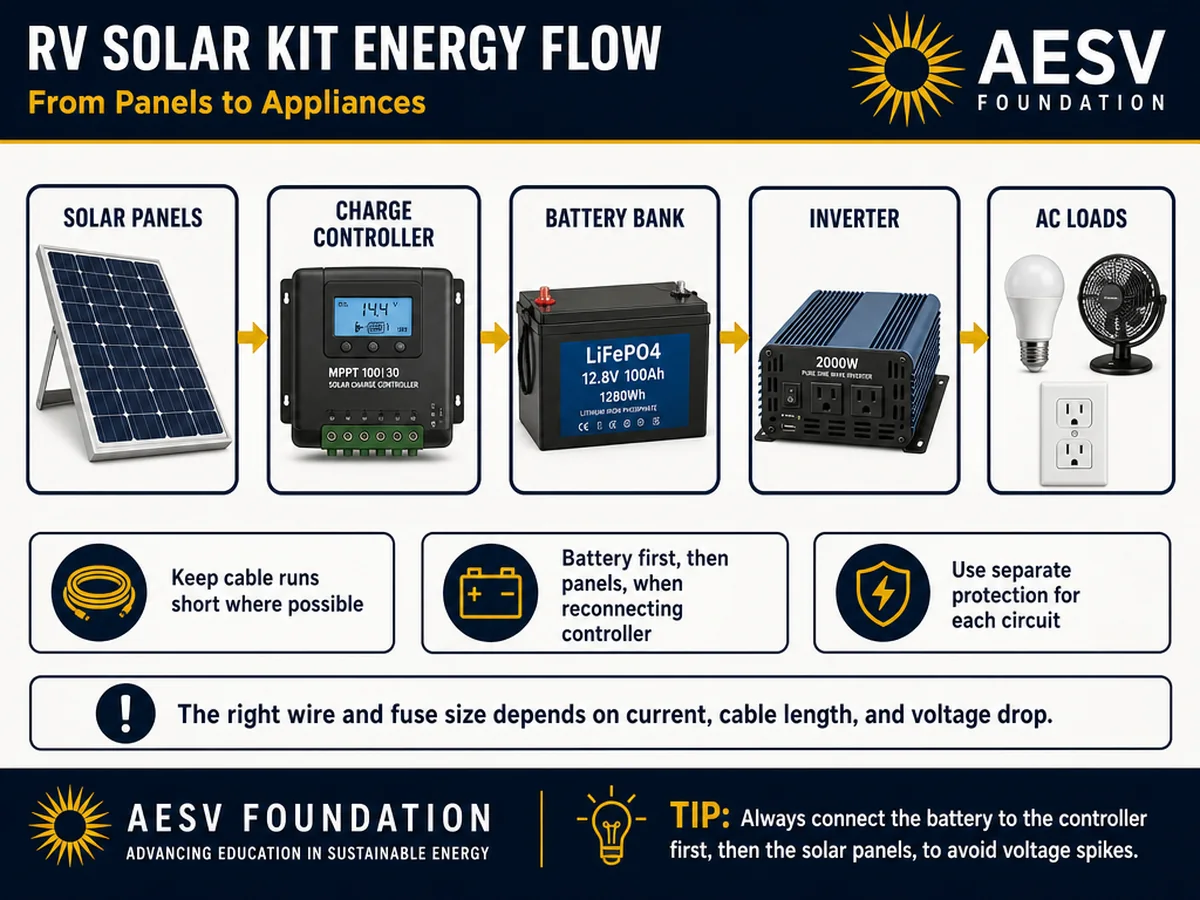
Most RV solar kits revolve around five pieces: solar panels, a charge controller, a battery bank, an inverter for AC loads, and the cable and overcurrent protection that connect them.[1] The controller sits between the array and the batteries so it can regulate charging instead of letting the panels push energy straight into the bank.[4]
That layout matters because each leg of the system has a different job: the roof-side wiring has to move solar current efficiently, the controller has to convert panel output into battery-safe charging, and the battery-side wiring has to handle the highest practical current with the least possible voltage drop.[2][3][4]
Plan the install before you drill any holes.[1][5]
Map the panel location, the controller location, the battery bank, and the inverter, then check whether the path between those points is short enough to keep voltage loss under control.[2] In an RV, a neat cable route is not just cosmetic; it can be the difference between a system that performs normally and one that wastes output in the wiring.[2]
If you need a planning shortcut, work backward from daily use: estimate your daily watt-hours, then compare that number with the roof space and battery capacity you actually have.[5] If you are still estimating that number, use the AESV sizing calculator before you order hardware.[5]
Mount the panels first, but follow the roof structure.[1][5]
Use the kit’s supplied mounts or brackets and secure them to structure that can hold the load over vibration and travel.[1] The goal is not just to hold the panel up today; it is to keep the roof sealed and the panel secure through heat, road movement, and weather changes.[1][5]
Keep the cable entry point as direct as possible so the roof-side run stays short and tidy.[2] If the RV does not already have a wire entry point, measure twice, drill once, and seal the gland carefully after the wires are through, because a neat roof penetration is one of the main leak-prevention steps in the entire project.[1]
For bracket-vs-adhesive decisions, follow the mounting method the kit and roof type actually support rather than choosing the method that looks simplest on paper.[1] On a moving RV roof, the safest choice is the one that matches the hardware spec, the roof material, and the long-term sealing plan.[5]
Wire the controller, battery bank, and inverter in the correct order.[1][4]
The controller belongs between the solar array and the battery bank, where it can regulate charging rather than let the panels push current straight into the batteries.[1][4] Victron’s MPPT guidance is especially clear on commissioning order: for error recovery, disconnect the solar panels and the battery, then reconnect the battery first and the panels second.[4]
That order matters because the controller needs to see the battery before the array in order to start cleanly and avoid a confusing or unsafe startup state.[1][4] The same idea applies when you are expanding the system later: shut the array down, isolate the battery, and only then work the wiring.[4]
For inverter work, keep the DC feed short and protected, because high-current loads punish weak cable choices faster than panel circuits do.[3] A small wiring mistake on the inverter side can create heat, nuisance trips, or a fault that looks like a battery problem when it is really a cable problem.[4]
Size the wire and fuses for the current, not for hope.[2][3][4]
Wire size on a 12V RV solar system depends on current, cable length, and acceptable voltage drop.[2] Renogy’s cable guidance recommends keeping voltage loss within about 2–3% between the panel and charge controller, and less than 1% between the controller and the battery bank.[2]
Victron’s charger documentation also warns that loose DC cable connections and cables that are too thin can cause high DC ripple voltage.[4] In plain English: a “good enough” cable choice can become an efficiency loss today and a heat problem later.[2][4]
Fuse sizing follows the same logic because Renogy’s fuse guide recommends choosing a controller-to-battery fuse or breaker at about 1.25 times the controller’s maximum output.[3] The solar-array side and inverter side are separate protection decisions, not one shared fuse for everything.[3]
A simple sizing example for a 12V RV roof system.[2][3][5]
Suppose your daily use adds up to 1,200 Wh. If the battery bank charges at roughly 13.2V, that is about 91Ah of charging energy per day before losses and weather are considered.[5] That estimate is not a final design, but it is enough to tell you whether a small portable kit or a larger roof array makes more sense.[5]
If you plan a 400W array, the system does not need a 400W controller by name; it needs a controller that can safely handle the array’s input conditions and the battery-side current it will produce.[1][4] The label on the panels, the controller’s voltage ceiling, and the battery-bank charge limits all need to be checked together before you buy anything.[3]
Commercial shortlist: current kit comparison and CTA.[6]
The kit comparison below is based on the current Renogy store lineup visible at review time; price and availability can change, so recheck the live product pages at publication.[6] The links below should stay marked as sponsored/nofollow in the published article.[6]
| Kit | Best fit | Current store status | CTA |
|---|---|---|---|
| 800W 12V Essential Solar Panel Kit | Larger roof layouts and readers who want a straightforward roof-mounted package.[6] | Visible on the live store page; verify the current price at publish.[6] | Check live price |
| 600W 12V ShadowFlux™ Solar Panel Kit with 5.12kWh Battery | Readers who want an integrated bundle rather than a parts list.[6] | Add-to-cart available on the live store page; verify the current price at publish.[6] | Review bundle |
| RV Solution | Go Far 3.8kWh & Go Further 7.6kWh | Longer-trip RV use cases where the battery bundle matters as much as panel wattage.[6] | Visible on the live store page; verify the current price and stock at publish.[6] | Compare RV bundles |
Use the table as a shortlist, not as a substitute for the actual load calculation.[5] If the calculator says you need a smaller or larger system, let the sizing result win and then pick the kit that best matches the roof, battery, and controller requirements.[5]
FAQ.[1][2][3]
Do I always need a charge controller for an RV solar kit?[1][4]
In a normal RV solar setup, yes. The controller regulates charging and keeps the battery bank from being overcharged.[1][4]
What is the most important connection order?[1][4]
Connect the battery first, then the solar panels, and follow the kit’s startup sequence after that.[1][4]
How far can I run the cable from the roof to the controller?[2][4]
There is no universal distance, because the right answer depends on current, cable size, and voltage drop.[2][4] The shorter the run, the easier it is to stay inside the recommended voltage-loss range.[2]
How do I know what fuse size to use?[3]
Start with the component’s maximum current and size the protection accordingly.[3] Renogy’s example uses 1.25× the controller’s maximum output for the controller-to-battery fuse or breaker.[3]
Calculator CTA and related internal links.[1][5]
If you are still deciding between a 200W, 400W, or larger kit, use the RV solar calculator before you finalize the panel count, battery size, or cable order.[5] Then connect this guide to Best Solar Charge Controllers for 2026 and Best Home Solar Kits so the reader can move from planning to comparison without leaving AESV.[5]
Sources
- [1] https://www.renogy.com/blogs/buyers-guide/how-to-install-rv-solar-kit
- [2] https://www.renogy.com/blogs/buyers-guide/what-size-cable-for-12v-solar-panel
- [3] https://www.renogy.com/blogs/buyers-guide/how-to-fuse-your-solar-system
- [4] https://www.victronenergy.com/live/mppt-error-codes
- [5] https://www.energy.gov/cmei/systems/homeowners-guide-solar
- [6] https://www.renogy.com/pages/store
