
Affiliate disclosure: AESV is reader-supported. If you buy through links on this page, we may earn a commission at no extra cost to you. As an Amazon Associate, AESV earns from qualifying purchases.
A DIY LiFePO4 solar battery bank can work very well for off-grid cabins, RVs, sheds, and backup power systems, but the details matter. The bank has to match the load, the voltage has to match the rest of the system, and the wiring and protection devices have to be sized for the current that can actually flow. With pre-winter planning season approaching, now is a good time to size and build a bank that will perform reliably through cold weather.
LiFePO4 is popular because a single cell is typically 3.2V nominal, while common 12V, 24V, and 48V banks are built from that same chemistry in different series counts.[1] That makes the chemistry familiar, but the system design still needs careful planning.
Quick safety note: charging LiFePO4 below freezing is the main temperature hazard to avoid. A practical planning range is about 0°C to 45°C for charging, while discharge can usually tolerate a wider range depending on the pack and BMS.[2]
Start with the load, not the battery
The first job is to estimate daily energy use in watt-hours. Add the watt-hours of the lights, fans, appliances, controllers, and inverter loads you want to run in a day. If you only size from battery capacity, you can end up with a bank that looks large on paper but still runs short during real use.[3]
A simple sizing formula is:[3]
- Required battery energy (Wh) = daily load (Wh) × autonomy days ÷ usable depth of discharge ÷ system efficiency
- Required battery capacity (Ah) = required battery energy (Wh) ÷ nominal battery voltage
For example, if a cabin uses 2,000Wh per day, needs 2 days of autonomy, and you plan around 80% usable depth of discharge and 90% system efficiency, the bank needs about 5,556Wh. That works out to roughly 434Ah at 12.8V nominal, 217Ah at 25.6V nominal, or 109Ah at 51.2V nominal.[3]
That example is the main reason many larger DIY systems move away from 12V. The energy requirement does not change, but higher system voltage cuts current dramatically, which reduces conductor size and voltage-drop pressure.[4]
Choose the right system voltage
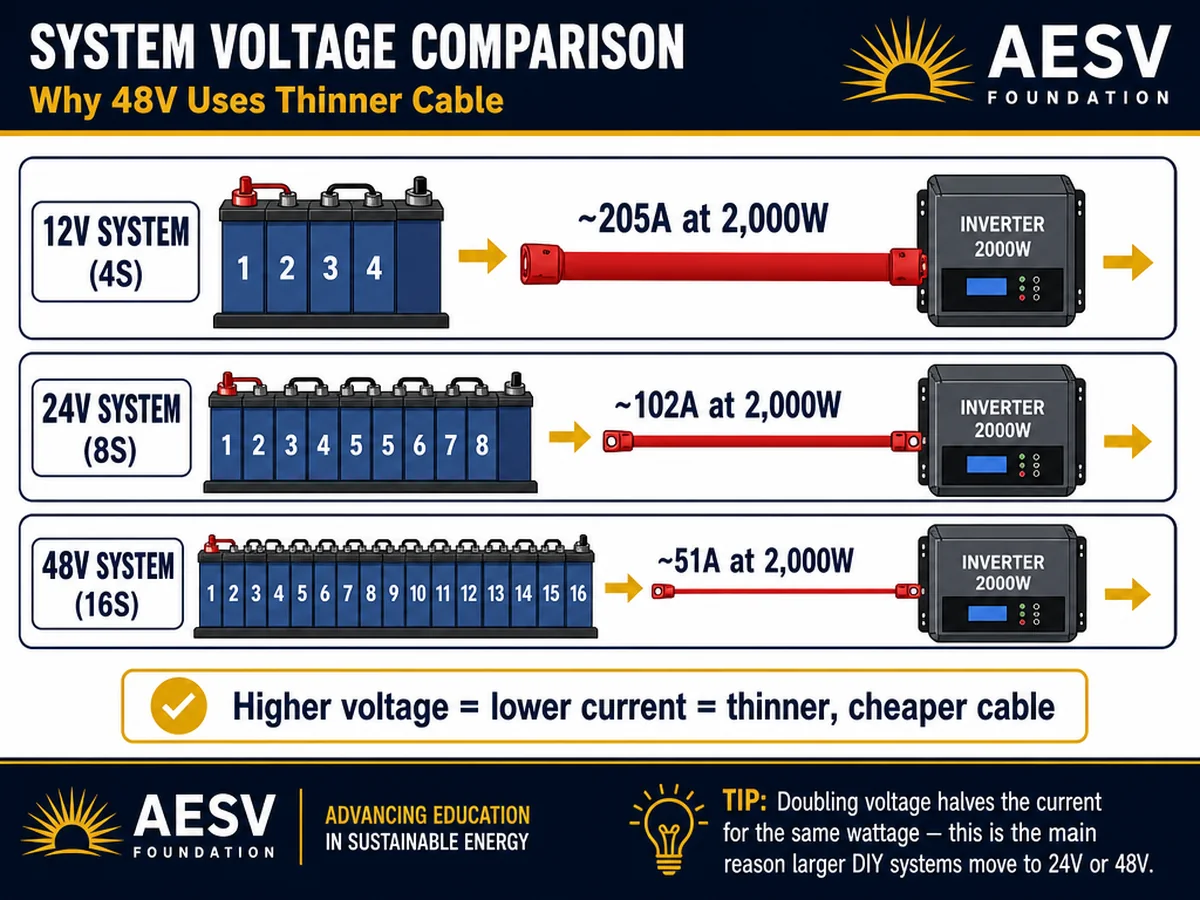
LiFePO4 voltage charts show the basic relationship clearly: a single cell is typically 3.2V nominal, 12V-class batteries are built from four cells in series (4S), 24V-class batteries from eight cells (8S), and 48V-class batteries from sixteen cells (16S).[1] The right choice depends on how much power you need and how much current your loads will draw.
| System voltage | Best fit | Example current for a 2,000W inverter |
|---|---|---|
| 12V nominal (4S) | Small cabins, light RV loads, compact backup systems | About 205A at low battery voltage |
| 24V nominal (8S) | Mid-size DIY systems with moderate inverter loads | About 102A at low battery voltage |
| 48V nominal (16S) | Larger off-grid systems and higher inverter power | About 51A at low battery voltage |
The table above uses the same power level to show the wiring difference only. Renogy’s 48V battery bank guide explains the relationship directly: doubling the voltage halves the current for the same wattage, which means smaller and less expensive cabling.[4] At the same load, a 48V bank carries far less current than a 12V bank, so the wiring and protection devices can usually be smaller and easier to manage.
If the system will power an inverter, chargers, and future expansion, 24V or 48V is usually the cleaner design. If the project is very small and the cable runs are short, 12V can still be practical.[4]
Wire the bank to protect the cable first
Wire and fuse sizing are not the place to guess. Hubble’s cable and fuse guide states that the fuse should be equal to or lower than the wire’s ampacity, and it also notes that the fuse should be slightly higher than the expected draw while staying within cable limits.[5] Cerrowire’s ampacity reference also highlights that conductor size depends on temperature, insulation type, and voltage-drop requirements.[6]
In practice, that means the fuse protects the cable, not just the appliance. If a short circuit or fault occurs, the cable should never be the weakest link.[5]
- Keep the main fuse as close to the battery positive terminal as practical.[7]
- Use the conductor size that matches the actual current and run length.[6]
- Check voltage drop on longer runs — a common target is 2–3% under normal operating conditions.[7]
- Use a proper disconnect so the bank can be isolated for service.[7]
Battle Born’s cable sizing guide explains that cable sizing is based on two primary factors: the amount of current flowing through the cable and the length of the cable run. Higher current requires thicker cable, and longer runs also require thicker cable to keep voltage drop within acceptable limits.[7]
For the inverter feeder, the cable should be sized for the worst-case current, not the average load. Hubble’s guide also shows a current-based method for finding fuse size, which is useful when the inverter can briefly pull much more current than the everyday loads suggest.[5]
Build the bank with the temperature limits in mind
LiFePO4 batteries are more forgiving than many other lithium chemistries, but they are still temperature-sensitive. Anern’s 2026 guide lists a common planning range of about 0°C to 45°C for charging, and it notes that charging below freezing should be blocked unless the battery has approved heating protection.[2]
That matters for garages, unheated sheds, and RV compartments in winter. A battery bank that performs well in summer can be abused in cold weather if the charger or solar controller is left in a default lithium mode with no low-temperature cutoff. If you are planning a pre-winter build, pay close attention to whether your battery has self-heating or low-temp cutoff features, and confirm that your charger or controller respects those limits.[2]
Discharge behavior is less restrictive than charging, but usable capacity still falls as temperatures drop.[2] If you size a bank for a winter cabin, do not assume the same runtime you would get on a mild day.
Set charging parameters from the battery manual, not guesswork
LiTime’s voltage chart shows the basic LiFePO4 pattern: a 3.2V nominal cell, a 3.65V full-charge ceiling, and a 12V-class pack that reaches about 14.6V when fully charged.[1] Use the battery maker’s manual and the charger or MPPT controller manual together, because the battery and charging equipment have to agree on the same voltage targets and safety limits.
Battle Born’s installation guide warns that if your charging equipment is not configured for LiFePO4, several issues can occur: batteries may not fully charge, charging may stop prematurely, or the system may disconnect under certain conditions.[7] For a DIY bank, the important rule is consistency. Match the charger profile to the battery chemistry, confirm the low-temperature cutoff behavior, and test the system before it is relied on for daily use.
- Confirm the battery’s nominal voltage and charging ceiling.[1]
- Verify the controller or charger has a LiFePO4 profile or programmable setpoints.[7]
- Check that the BMS or external controls handle cold-weather charging.[2]
- Test the full system under load before closing up the enclosure.[7]
Upgrading from lead-acid to LiFePO4
If you already have a solar system with lead-acid batteries and want to switch to LiFePO4, there are a few compatibility points to check before you buy.[8]
First, the charge controller. A lead-acid charge profile typically uses a different absorption voltage and float voltage than LiFePO4 needs. If the controller cannot be switched to a lithium profile or programmed with the correct setpoints, it will not charge the new batteries properly.[7] Most modern MPPT controllers have a selectable LiFePO4 mode, but older PWM controllers may not.
Second, the inverter low-voltage cutoff. Lead-acid batteries sag in voltage as they discharge, and many inverters are set to disconnect at a voltage that corresponds to roughly 50% lead-acid discharge. LiFePO4 batteries hold a much flatter voltage curve, so the inverter may shut off while the battery still has significant capacity left.[8] Check the inverter’s low-voltage disconnect setting and adjust it to match the LiFePO4 manufacturer’s recommendation.
Third, the BMS. If you are replacing individual cells with a BMS you add yourself, make sure the BMS is matched to your series configuration (4S for 12V, 8S for 24V, 16S for 48V) and that it can handle the current your inverter draws.[7] If you are using drop-in replacement batteries with an internal BMS, the integration is simpler, but you still need to verify the charging and cutoff settings.
Key difference: LiFePO4 batteries accept charge more efficiently and at higher rates than traditional lead-acid systems.[8] A 100Ah lithium battery often provides comparable usable energy to a 200Ah lead-acid bank because you can safely use a much higher percentage of the rated capacity.[9]
Commission the system in a controlled order
Once the bank is built, commission it in stages. Start with mechanical inspection, then verify polarity, then check fuse placement, then power up the controller, and only then connect major loads. That sequence reduces the chance of a wiring mistake turning into a damaged controller or inverter.[7]
Battle Born’s installation guide identifies the most common mistakes as incorrect cable sizing, missing or incorrectly sized fuses, and charging equipment that was not configured for the battery chemistry.[7] Each of those problems is easier to catch during a staged commissioning than after a load is connected.
A good first test is a small load that is easy to monitor. After that, increase the load gradually and watch battery voltage, temperature, and cable heating. If anything warms up more than expected, stop and inspect the system before continuing.
For readers building their first system, our battery-bank sizing calculator can speed up the math, and the solar battery guide covers the planning logic behind the numbers.
Component shortlist: what to buy
Below is a shortlist of verified components for a typical 12V 100Ah DIY LiFePO4 bank. Prices were checked at publication time — verify current pricing and availability before ordering.
| Component | Product | Where to buy | Notes |
|---|---|---|---|
| Battery (12V 100Ah) | LiTime 12V 100Ah LiFePO4 | LiTime direct (5% commission program) | Group 31 size, built-in 100A BMS, 4000+ cycles at 100% DoD, no low-temp protection; charge only above 0°C. Check current price on LiTime. |
| BMS (if building from cells) | DALY 4S 12V 100A BMS | Amazon | Matches 4S 12V configuration. Verify current price and buy box. |
| Charger | LiTime 12V 20A LiFePO4 Charger | Amazon | LiFePO4-specific profile. Verify current price. |
| Fuse (Class-T or MRBF) | Match to system current | Amazon or local supplier | Size to cable ampacity, not just load.[5][6] |
| Cable | Match to current and run length | Amazon or local supplier | Check voltage drop — target 2–3%.[7] |
A note on merchant choice: For the battery itself, buying direct from LiTime’s affiliate program may give a better rate than Amazon for high-ticket items. For smaller components like BMS units, fuses, and cable, Amazon Associates is usually the simpler path. Verify stock and pricing before publishing — LiTime battery availability can change quickly.
Common mistakes to avoid
- Sizing the bank from battery amp-hours alone instead of real daily load.[3]
- Using 12V when the inverter current would be far lower at 24V or 48V.[4]
- Putting the fuse too far from the battery.[7]
- Ignoring cable length and voltage drop on the inverter feeder.[5][7]
- Charging below freezing without a battery-approved heating or cutoff strategy.[2]
- Assuming a charger preset is correct without checking the battery manual.[1][7]
- Not configuring the charge controller for LiFePO4 when upgrading from lead-acid.[7][8]
If the project will be expanded later, leave space for a larger controller, a heavier cable run, and a serviceable disconnect location. Retrofitting those details is usually harder than planning them at the start.
FAQ
How many LiFePO4 batteries do I need?
Start with the watt-hours you need per day, then divide by usable depth of discharge, efficiency, and nominal voltage. The required Ah changes a lot when you move from 12V to 24V or 48V. Renogy’s sizing guide walks through the conversion from daily Wh to required Ah, factoring in autonomy days and DoD.[3]
Can I charge LiFePO4 below freezing?
Not unless the battery system explicitly supports it. Anern’s guide says charging should be blocked below freezing unless the battery has approved heating protection.[2] Some batteries include self-heating or low-temp cutoff features — check the product specs before buying for cold-climate use.
Is 12V or 24V better for a DIY battery bank?
For small systems, 12V can be simple. For most medium and larger systems, 24V or 48V is often better because the current is lower for the same power. Renogy’s 48V guide shows that doubling the voltage halves the required amperage, which means smaller and less expensive wiring.[1][4]
Do I need a special charger?
You need a charger or solar controller that can be set correctly for LiFePO4 and that matches the battery’s charging limits and temperature rules. Battle Born’s installation guide warns that using a lead-acid profile on LiFePO4 can cause incomplete charging or premature disconnection.[1][7]
Do I need a fuse on the battery bank?
Yes. The fuse should protect the cable and be chosen so it does not exceed the conductor’s ampacity. Hubble’s cable and fuse guide and Cerrowire’s ampacity charts both confirm that the fuse is a cable-protection device, not just an appliance-protection device.[5][6]
Can I drop LiFePO4 batteries into an existing lead-acid system?
Often yes, but you need to check three things: the charge controller must have a LiFePO4 profile, the inverter’s low-voltage cutoff must be adjusted for lithium’s flatter discharge curve, and the BMS (internal or external) must handle your system’s current.[7][8]
Bottom line
A good DIY LiFePO4 solar battery bank is built on three decisions: size it from real loads, choose a system voltage that keeps current manageable, and protect the wiring with the right fuse and cable. If you get those three pieces right, the rest of the build becomes much easier to commission and maintain.
Before you buy parts, run the numbers in the calculator, confirm the battery manual, and verify that the controller, inverter, fuse, and cable all belong to the same system design.
Sources
- [1] LiTime — LiFePO4 Voltage Chart
- [2] Anern — LiFePO4 Temperature Range Guide (2026)
- [3] Renogy — How to Size Your Battery Bank
- [4] Renogy — Why Choose a 48V Battery Bank
- [5] Hubble Lithium — Cable Size and Fuse Rating
- [6] Cerrowire — Ampacity Charts
- [7] Battle Born — Common Lithium Battery Installation Mistakes
- [8] Battle Born — What Changes When You Switch to Lithium
- [9] Battle Born — Lead-Acid vs AGM vs Lithium Batteries
