
A DIY portable solar generator is really a compact off-grid power system in a case, cart, or small enclosure. It combines a battery, battery management, inverter, charge controller, protective devices, and solar input into one system that can run AC loads when the grid is unavailable or when you want portable power away from home.
This guide focuses on the sizing sequence that keeps the build honest: define the loads first, choose the battery around usable watt-hours, confirm inverter headroom, then size the solar input and protection around that design. If you skip the load math and shop by component size alone, the result is usually either underpowered, overpriced, or both.
For a quick cross-check, AESV’s calculator can sanity-check your load, battery, and panel numbers before you buy parts: https://alternativeenergysourcesv.com/calculator/.
If you are still deciding whether to build or buy — or want a parts list with real 2026 cost ranges before you start — see the companion guide: DIY Solar Generator: Parts List, Real Costs & the Build-vs-Buy Decision.
1. Start with the load list, not the shopping list
The right first question is not “which battery should I buy?” It is “what do I need to run, for how long, and at what voltage?” Once you know the real daily watt-hours, the rest of the design becomes much easier.
Write down the loads you actually want this portable system to support. A camping station, a home-outage backup box, and a field-work power pack often have very different duty cycles, even if they all use solar input.
- List each load in watts.
- Estimate the hours per day it will run.
- Multiply watts × hours to get watt-hours per day.
- Add a margin for losses, imperfect weather, and future use.
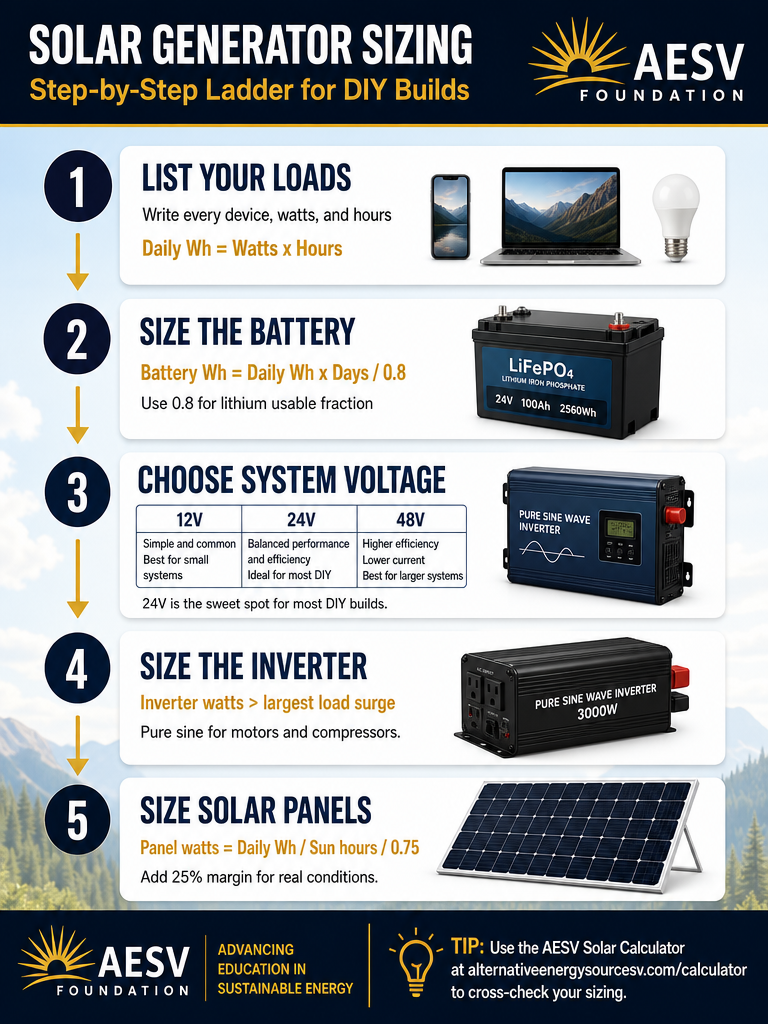
Core formula: daily watt-hours = watts × hours. Once that is known, battery size, array size, and inverter headroom can all be calculated from the same starting point instead of guessed independently.
2. What goes inside a DIY portable solar generator
Renogy’s DIY off-grid component catalog is a good example of the standard building blocks in this kind of system: battery storage, inverter output, MPPT solar charging, and the support hardware needed to keep the system controlled and safe.[1]
- Battery — stores energy for later use.
- BMS / battery protection — prevents unsafe charge, discharge, and temperature conditions in lithium packs.
- Pure sine inverter — converts DC battery power to household AC power.
- MPPT charge controller — turns solar input into controlled battery charging.
- Fuse / breaker and disconnects — protect the wiring and let you isolate sections for service.
- Enclosure, cable, lugs, and bus bars — keep the build mechanically organized and electrically reliable.
The important point is that none of these parts should be chosen in isolation. A battery that looks large enough may still fail if the inverter surge is too high, the charge controller is undersized, or the wire path introduces too much voltage drop.
3. Choose battery capacity from usable watt-hours
Battery sizing is easier if you think in usable watt-hours instead of amp-hours. That keeps the math consistent when you compare 12V, 24V, and 48V systems.
Core formula: battery watt-hours = daily watt-hours × days of autonomy ÷ usable fraction.
For lithium builds, a usable fraction around 0.8 is a practical planning baseline. The exact value should still follow the battery manufacturer’s limits and the BMS settings. Battery University notes that lithium iron phosphate has the same general charge characteristics as lithium-ion, with lower terminal voltage and a high cycle-count advantage, while BU-410 states that lithium-ion should not be charged below freezing.[3][4]
Practical rule: if the battery must be portable, do not design it so tightly that you have no room for real-world weather, cable loss, or conversion loss.
4. Pick the system voltage that matches the power level
Voltage choice is mostly about current. Higher voltage means lower current for the same wattage, which usually means easier wiring and lower losses. For truly portable builds, 12V can be fine at small scale, but 24V often becomes the cleaner choice once the system grows beyond a simple phone-and-laptop box.
| System voltage | Best fit | Tradeoff |
|---|---|---|
| 12V | Small portable boxes, light camping loads, simple accessory charging | Higher current at the same power level, so cables and connectors become more demanding as loads rise |
| 24V | Most DIY power stations with moderate AC output and better cable efficiency | Slightly less common in very small consumer accessories, but usually a better engineering choice for larger portable builds |
| 48V | Larger stationary off-grid systems, not usually the first choice for a carryable power box | Excellent for reducing current, but the hardware is less “portable-generator” friendly |
For this topic, a 24V architecture is often the most balanced answer because it keeps current manageable without turning the build into a large cabinet-style system.
5. Worked example: a portable station for daily essentials
Here is a simple planning example that the reader can copy into the calculator or a notebook before buying any hardware.
- Daily load: 1,200 Wh/day
- Autonomy target: 1.5 days
- Usable lithium fraction: 0.8
- Design sun-hours: 4.5 peak sun hours
- Real-world system efficiency: 0.75
Battery watt-hours: 1,200 × 1.5 ÷ 0.8 = 2,250 Wh.
Battery amp-hours at 24V: 2,250 ÷ 24 = about 93.8 Ah.
Solar array size: 1,200 ÷ 4.5 ÷ 0.75 = about 356 W.
In practice, that usually rounds to a 24V 100Ah lithium battery and roughly 400W of solar input, with an inverter sized above the largest simultaneous AC load rather than above the battery number itself. Victron’s manual library is a reminder that exact inverter and charger limits are product-specific, so the final wiring must still follow the actual equipment documentation.[2]
6. Safety boundaries that should not be skipped
A DIY portable solar generator is small, but it is still a real electrical system. The safest builds respect battery temperature limits, overcurrent protection, and cable routing from the start.
- Follow the battery manufacturer’s low-temperature charging limit. BU-410 states that Li-ion should not be charged below freezing.[3]
- Use a battery with BMS protection that matches the chemistry and current draw.
- Put protection on the battery positive path as close to the battery as practical.
- Use a pure sine inverter for electronics and most motor-driven loads.
- Keep AC and DC wiring clearly separated and clearly labeled.
- Do not guess wire size or connector quality when the system will carry high current.
If the build will live outdoors, in a garage, or in a cold climate, battery temperature management becomes part of the design, not an afterthought. That is especially important for lithium packs that may refuse charging or degrade quickly if the system is used outside its safe temperature range.[3][4]
7. Use AESV’s calculator to verify the final numbers
Once the rough design is in place, move the numbers into AESV’s calculator and compare the result against your own back-of-the-envelope math: AESV Solar Backup & Battery Sizing Calculator.
If the calculator and your manual math disagree by a wide margin, the most likely cause is a missing assumption: hours of use, autonomy days, inverter losses, or an optimistic solar estimate.
Related AESV reading that fits naturally with this guide:
8. FAQ
Is a DIY portable solar generator worth it?
It is worth it when the reader wants a repairable system with a custom battery size, custom inverter output, or a form factor that off-the-shelf power stations do not offer. It is not the right choice if the goal is pure plug-and-play simplicity.
Do I need MPPT, or will PWM work?
For a DIY portable solar generator, MPPT is usually the better choice because it is the normal way to turn panel output into controlled battery charging in a modern build. PWM can work in simpler setups, but it is usually not the best match for a higher-performance portable system.
Should I build 12V, 24V, or 48V?
Choose 12V only for small, simple, low-power builds. Choose 24V for most serious portable systems because it keeps current more manageable. Choose 48V only if the system is drifting out of the “portable” category and into a larger off-grid cabinet or cart build.
Can I charge lithium batteries in freezing weather?
Not unless the battery manufacturer specifically allows it or the pack includes a low-temperature charging solution. Battery University’s BU-410 notes that lithium-ion should not be charged below freezing.[3]
What is the most common sizing mistake?
The most common mistake is sizing from the battery alone and forgetting the inverter surge, panel wattage, wire losses, or low-temperature limits. A build can look “big” on paper and still fail if one of those limits is ignored.
Sources
- [1] Renogy, DIY Off-Grid Solar Kits & Components: Build Your Own Power System — component architecture and example DIY off-grid system blocks.
- [2] Victron Energy, Manuals — product-specific inverter, charger, and system documentation.
- [3] Battery University, BU-410: Charging at High and Low Temperatures — lithium charging limits in cold weather, including no charging below freezing.
- [4] Battery University, BU-409b: Charging Lithium Iron Phosphate — LFP charge characteristics and cycle-life context.
- [5] AESV, Solar Backup & Battery Sizing Calculator — manual cross-check for load, battery, and solar sizing.
- [6] AESV, DIY LiFePO4 Solar Battery Bank: Safety, Sizing & Wiring — battery-bank cross-link for readers who want deeper pack design guidance.
- [7] AESV, Solar Inverter Sizing Guide — inverter selection and headroom cross-link.
