
Why choose a ground mount instead of a roof mount
A ground mount is the right choice when the roof is shaded, old, fragile, too small, or simply not the best structure for a solar array. DOE notes that PV arrays need a stable, durable mounting structure that can withstand wind, rain, hail, and corrosion over decades, and that fixed systems are commonly tilted to suit the local latitude and site conditions.[1]
For homeowners, the practical advantage is simple: the array can be placed where the sun is strongest and the structure can be built around the site rather than forced onto the roof. The trade-off is that you now have to think like a small project designer. Tilt, spacing, anchoring, and access paths all matter.
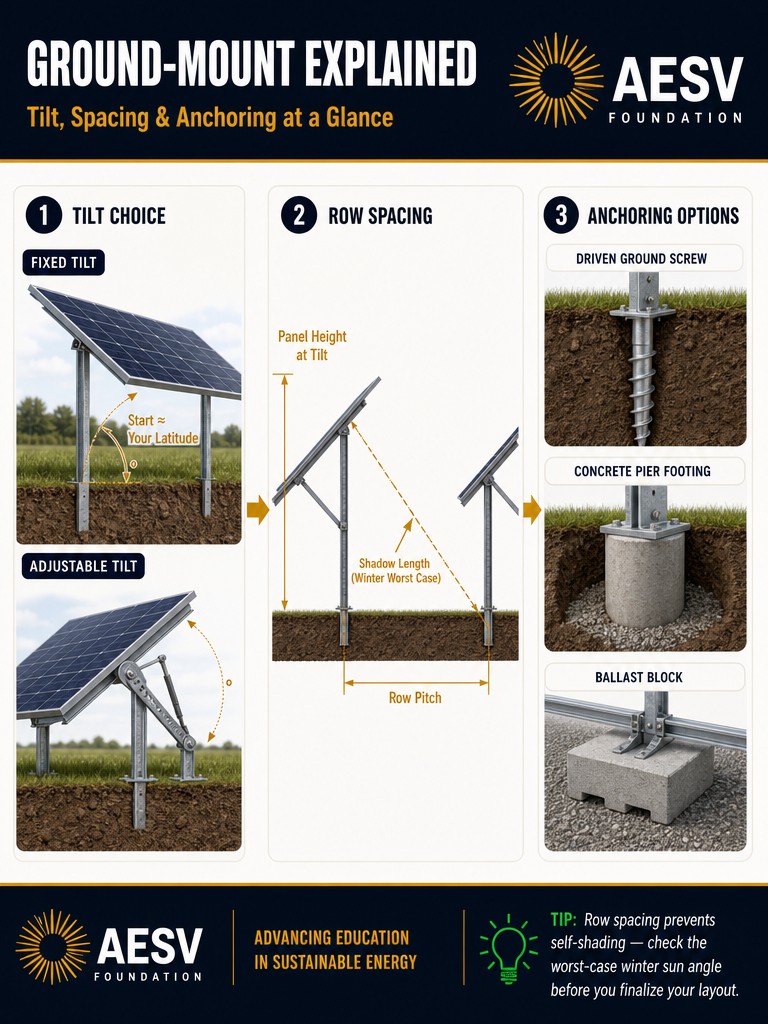
Tilt: start with latitude, then decide whether fixed or adjustable makes sense
A practical first-pass formula for a fixed ground mount is simple: starting tilt in degrees is approximately equal to local latitude.[1] For a homeowner layout, that gives you a reliable starting point before you tune the angle for snow, winter output, land area, or the racking you can actually build.
The fixed-vs-adjustable decision is mostly a trade-off between simplicity and flexibility. Fixed tilt is easier to build, easier to keep aligned, and usually cheaper. Adjustable tilt can make sense when seasonal tuning matters, but it adds hardware, setup time, and more chances for error. If the site is already tight on space, a fixed layout is often the cleaner answer because there is less to maintain and fewer moving parts to fail.
- Use latitude as the first estimate for a fixed array.[1]
- Choose fixed tilt when simplicity, reliability, and lower maintenance matter most.
- Choose adjustable tilt only if the seasonal gain justifies the extra hardware and adjustment work.
- Keep the final angle consistent with the racking and foundation you can actually build.[5]
Row spacing: the geometry that prevents self-shading
Row spacing is the part most DIY builds underestimate. If the front row throws a shadow onto the row behind it, winter production drops and the array footprint can become frustratingly narrow. A useful planning method is to calculate the vertical rise created by tilt, then add the horizontal projection of the panel to the shadow distance at the worst-case sun angle. That gives you a conservative row pitch for a level site.
A simple calculator workflow is enough for a first draft: set the site latitude, choose a winter worst-case sun angle, measure panel length in the tilt direction, and solve for pitch. For a homeowner draft, the key question is not only “will it fit?” but “will it fit without shading itself during the months when energy matters most?” Use the calculator page before you buy rails, posts, or concrete so you do not lock in the wrong footprint.
Access matters too. If the array must be mowed around or serviced by hand, leave enough clearance to move a mower, carry tools, and inspect the rear row without stepping through fragile wiring or leaning on module edges.
Anchoring options: choose the foundation that matches your soil and load path
Anchoring is where a solar layout becomes a structure. Unirac’s Ground Fixed Tilt page points to multiple foundation types, including 4.5-inch by 6-inch C-pile systems, and to region-specific engineering rather than one universal foundation.[5] That is the right mindset for a DIY build too: the correct anchor depends on soil, frost, wind exposure, and local code requirements.
| Anchoring method | Best fit | What to watch | DIY note |
|---|---|---|---|
| Ground screws / driven piles | Stable soils and faster installs | Soil conditions, embedment, corrosion protection | Good if you can verify site conditions and source the right hardware |
| Concrete piers | Sites where a permanent footing makes sense | Frost depth, cure time, footing sizing, rebar layout | Simple in concept, but only if you respect local foundation rules |
| Ballast | Locations where penetration is limited or undesirable | Weight, movement, wind uplift, drainage, long-term settlement | Keep the array conservative; ballast is not a shortcut around engineering |
The wind-load question is not “what looks strongest?” It is “how does uplift move through the system?” In a ground mount, that load path runs from the module clamps into the rails, then into the posts or ballast, and finally into the soil or concrete. Ballast resists uplift with dead weight and friction, so it must be sized conservatively and checked against drainage, frost, and movement. It is a load-path choice, not a substitute for structure.
The practical rule is not “pick the cheapest option.” It is “pick the anchor that keeps the array stable under the site’s real wind and soil conditions.” If those conditions are unclear, stop and get the site reviewed before you pour concrete or place ballast.
Parts list: build the layout before you buy the hardware
The exact BOM changes with panel count and foundation type, but most DIY ground mounts need the same basic system pieces: modules, rails, posts or piers, module clamps, foundation hardware, grounding/bonding parts, wire management, and an inverter or charge-controller path that matches the electrical design.[1][5]
- Solar modules sized for the planned array footprint.[1]
- Rails or beams matched to the chosen racking system.[5]
- Posts, piles, screws, concrete, or ballast.[5]
- Mid clamps, end clamps, bolts, and bonding hardware.[5]
- Wire clips, conduit, junction box, and grounding path.[1][5]
- Combiner, inverter, or charge controller as required by the system design.[1]
Do not order parts in isolation. The hardware should follow the layout, not the other way around.
Safety: solar is a DIY project, but not a guesswork project
OSHA identifies electrocution, arc flash, falls, and overhead-power-line hazards in solar work, and it warns that workers can be exposed to electrical shocks and burns when hooking up solar panels to a circuit.[3] OSHA also highlights fall hazards during solar installation and says workers should not carry panels up ladders.[4]
- Keep clear of overhead lines and treat energized conductors as hazardous.[3]
- De-energize, isolate, and verify the circuit before service.[3]
- Use lifting methods that keep panels off ladders when possible.[4]
- Do not treat structural decisions, electrical decisions, and height safety as separate issues.[3][4][5]
- If local code or permitting is unclear, involve a licensed professional before build-out.[1][5]
The safest DIY rule is simple: if the task combines structural load, electrical connection, or work at height, slow down and confirm the procedure before you proceed.
Calculator-led workflow: size the footprint before you lock in the BOM
Once you have a starting tilt and a rough row pitch, use the calculator page to estimate usable ground area, row count, and the amount of hardware the site is likely to need. If you want a production estimate after the physical layout is set, DOE points homeowners to PVWatts as a first-pass performance tool.[2]
The point of the calculator step is not to replace final design review. It is to keep the project from drifting into a hardware order that cannot fit the site cleanly or safely. If you want broader array-sizing context, the solar system buyers guide is a better cross-check.
Frequently Asked Questions
What tilt should I use for a DIY ground mount?
Start near your local latitude and then adjust for the site. If the array must fit a tighter footprint, flatten the tilt slightly; if winter output or snow shedding matters more, a steeper angle may be suitable when the racking and engineering allow it.[1][5]
Should I build a fixed or adjustable tilt array?
Choose fixed tilt for a simpler, lower-maintenance structure. Choose adjustable tilt only when seasonal optimization is worth the extra hardware and setup work. For many DIY installs, fixed tilt is the safer default because it removes a moving part.
How far apart should the rows be?
Use the worst-case winter sun window you want to keep clear, then calculate row pitch from the panel’s raised edge and ground projection. The exact pitch depends on latitude, tilt, and the panel dimension in the tilt direction, so there is no universal spacing number.
Which anchoring method is best?
The best method is the one that matches the soil, load path, wind exposure, drainage, frost conditions, and local code. Ground screws, concrete piers, and ballast each have a place, but the final choice may require site-specific engineering.[5]
Closing checklist before you order hardware
- Latitude-based starting tilt chosen and written down.[1]
- Fixed-vs-adjustable decision made before hardware selection.
- Row spacing checked for self-shading and access clearance.
- Anchor choice matched to soil, frost, wind exposure, and local code.[5]
- Wind-load path reviewed from module to ground or footing.[1][5]
- BOM matches the layout, not the other way around.[1][5]
- Safety and permitting reviewed before installation begins.[3][4][5]
- If storage pairing is part of the project, review the LiFePO4 battery guide and the winterizing guide before finalizing the site plan.
If any of those boxes are still unclear, pause the build and resolve the site question first. The cheapest mistake on a ground mount is the one you catch before the posts are in the ground.
